Have a heart – a homemade one.
Kids can easily make valentines using scraps of paper, bits of ribbon, cloth, feathers or whatever’s at hand. Paper cut-out valentines are a great project for parents and kids to work on together, says artist Mary Cullen Lowman.
Lowman, educated at the Art Institute of Chicago and Northwestern University, is perhaps best known for the whimsical paintings she creates, often focusing on cats. She also specializes in cutting detailed silhouettes. She taught art for 30 years, and kindergarten for 17 years. She loves working with children, she said, because of their sense of humor and uninhibited natures.
“Paper crafts are very fun and simple for kids,” she said. “Work with them and they’re happy.”
For Valentine’s Day greetings, Lowman shares some ideas for kids old enough to wield scissors and a glue stick.
Young children will need help with scissors and should have paper patterns to draw around, she said.
HOW TO GET STARTED
Budding artists need an art bin, Lowman said. It could be a box, a large bin, a waste basket or trash can.
“All year long, parents can drop things into it for them to use,” Lowman said. “You can find things at back-yard sales.”
The bin could hold paper scraps, scrapbooking materials, ribbons, yarn and trim, cloth and other fibers, feathers, pompoms – any interesting material for art projects. Be sure to include other tools, like glue for fabric, paper, crayons, popsicle sticks, water-based finger paints and craft acrylics, and age-appropriate scissors.
Create a special place at home “where kids can create, synonymous for ‘mess with abandon,'” Mary says.
Spread a plastic sheet on the floor for a work space and consider using plastic trash bags with holes cut for head and arms to protect clothing. Bring out the disposable paper plates and cups to use for mixing and thinning paints.
Let the mess begin!
VALENTINE PAPER POSIES
Make a paper posy with a sweet center using colored paper, a bit of ribbon and a candy lollypop:
- Cut heart shapes for flower petals from four pieces of paper (if using easy-to-cut construction paper. Layer 4 pieces together and cut hearts out either free-hand or using a pattern.) Experiment with a variety of types of paper, paper doilies or other materials.
- Using a hole punch, make holes in each petal, near the hearts’ points.
- Lay the pieces out in the shape of a flower, with points in center. Arrange each piece so the holes line up. Attach together with paste, glue stick or rubber cement. Let dry.
- Thread a lollypop through the hole to make the flower’s center. Attach with glue or tape. Embellish with a bit of ribbon for leaves, or wrap the stem with green crepe paper.
ACCORDION-CUT SILHOUETTES
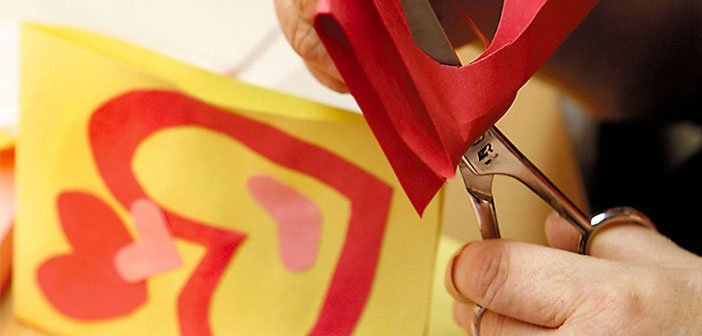
- Fold a piece of construction paper to make an accordion with at least four folds (more for older children.)
- Cut heart shapes free-hand (or use a pattern) on accordion’s front surface and one edge. Be sure it is connected on both sides or it won’t hold together. Try making heart people.
VALENTINE BONNET
- Cut a strip of construction paper about 18 inches long and 6 to 8 inches wide.
- Fold the paper in half lengthwise, then unfold and lay flat. Fold both edges of paper in toward the center so there are two folds. Place the paper on a flat surface, laying it horizontally.
- From bottom, cut along vertical fold lines just halfway up.
- Bend the sides in to form a hat that looks like a three-sided box. Secure with glue or tape. Fit to child’s head, trimming to fit.
- Attach heart ears on top (or make ears of other shapes, like reindeer antlers, bunny ears, etc.)
- Attach dangling ribbons or ties to the side.
SIMPLE GREETING CARDS
- Fold construction paper in fourths. Decorate it with positive (solid) and negative (cut-out) hearts. Decorate with drawings or photographs.
VALENTINE BOX TO COLLECT VALENTINES
- Using child’s paint, cover an empty laundry detergent box. Decorate with embellishments of your choice.
HEART JEWELRY
- Use air-dry (polymer) clay if you don’t have access to a kiln, or consider making papier mache jewelry. Using polymer clay, make heart shapes and poke a small hole with toothpick. Let air dry or bake as directed on package.
MAKE AN ART BIN
Start with a large, plastic container. Use it to store supplies and decorating “treasures” that have interesting colors, textures and shapes, such as:
- String
- Ribbon
- Tape
- Yarn
- Popsicle sticks
- Crayons
- Water-based paints
- Finger paints
- Craft acrylics
- Age-appropriate scissors
- Macaroni
- Scrapbooking supplies
- Sea shells
- Old jewelry
- Aquarium gravel
- Cardboard
- Cloth
- Wallpaper samples


